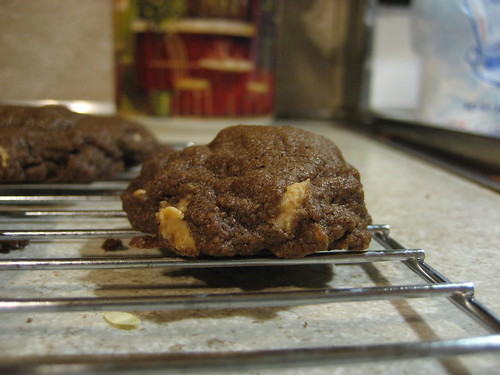
I started out wanting to post a cheesecake recipe for my recipe this month, but realized the awful truth: There's no way I have the time to make a cheesecake right now, and I'm sure you're all facing the same predicament! So instead, I'm posting a drop cookie recipe that should be pretty easy to make. Plus it combines my two favorite tastes - white chocolate and cherries! One tip is to make sure you use the parchment paper and not a non-stick pan. I don't know for sure if it's only for the gluten-free version, but supposedly the cookies will brown too quickly or burn without the paper.
White Chocolate & Cherry Drop Cookies
1/2 cup unsalted butter at room temp.
1 cup granulated sugar
1 tbsp packed light brown sugar
1 large egg
2 tsp pure vanilla extract
2 cups flour (GF blend)
1 tsp xanthan gum (probably not necessary in nonGF versions)
1/2 tsp baking powder
1/2 tsp salt
3.5 oz. white chocolate bar chopped in 1/4 in. chunks
1/4 cup dried cherries
1) Preheat oven to 375 and line baking sheets with parchment paper.
2) Beat butter, sugar, and brown sugar with mixer on low until smooth. Beat in egg and vanilla. Gradually add flour, salt, baking powder, and xanthan gum and beat until just blended. (Note to non-GF people: You may not need all the flour, so add that in bit by bit so it doesn't get too doughy) Stir in white chocolate chunks and cherries.
3) Using a wet tablespoon, drop balls of dough at least 2 inches apart on baking sheet. Spray bottom of drinking glass with cooking spray and flatten cookies. Place sheets on middle rack.
4) Bake 12 to 15 minutes. My book suggests rotating sheets between upper and lower middle racks, but you might just be fine if it's exactly in the middle (but I don't know for sure!) Cool cookies 2-3 minutes on baking sheet, then transfer to a wire rack to cool completely. Store, tightly covered, for up to 2 days or in the freezer for up to a month.
Enjoy the start of the summer, people! :)
Wednesday, June 3, 2009
Saturday, April 25, 2009
For the record, Steve and I apologize for falling so behind on our cooking. In our defense, I broke my foot about a month ago and thus managed to make the world a more complicated place with various surgery and recovery activities. The good news is I'm doing much better and life is starting to go somewhat back to normal! The bad news is I can't really cook on my own or provide lots of help in the kitchen.
So to get us back on the cooking bandwagon, we made gluten-free banana and blueberry yogurt muffins this morning for breakfast. They are so very light and airy though that they earned a new name once the batter was made: Fluffins! We used a basic muffin recipe in my gluten-free cookbook and modified it to include some blueberry yogurt and one banana that was floating around my kitchen. The results were quite tasty!!
To balance out the wet ingredients with the yogurt addition, I put slightly less of some ingredients. These are marked with a > symbol.
GF Fluffins (makes 12 fluffins)
Wet Ingredients
2 large eggs
> 3/4 cup milk
> 1/2 cup canola oil
1 single-serving container blueberry yogurt
1 banana, chopped (or smooshed I guess)
1 tsp vanilla extract
Dry Ingredients
1 1/2 cups white rice flour
> 3/4 cup tapioca flour
3/4 cup sugar
1 tbsp baking powder
1 1/2 tsp xanthan gum
1 tsp salt
1) Preheat oven to 375 and grease a muffin tin.
2) Beat eggs with an electric mixer on low speed until yellow and frothy, about 30 seconds. Add all other wet ingredients and mix on low until well blended.
3) Combine dry ingredients in a separate bowl and whisk until combined.
4) Gradually beat dry ingredients into wet ingredients mixture until batter is smooth.
5) Bake on middle rack for 25-30 minutes. Cool in pan for about 10 minutes.
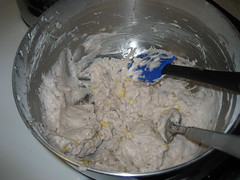
Fluffin batter!
Close-up to show the banana chunks.
I was slightly concerned with the brown color when Steve initially brought them out of the oven, but as you can see the insides are still fluffy and light as ever!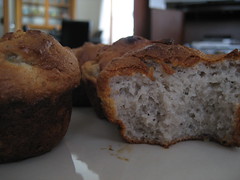
The taste of bananas and blueberries was well-balanced, and I would totally make this again. Not sure how to work the recipe for the glutenous folk, except maybe to just try about 1 3/4 cup of regular flour with no xanthan gum. Don't know if would turn out as fluffy, though! Also, Steve thinks we didn't need as much sugar because of the added ingredients.
So to get us back on the cooking bandwagon, we made gluten-free banana and blueberry yogurt muffins this morning for breakfast. They are so very light and airy though that they earned a new name once the batter was made: Fluffins! We used a basic muffin recipe in my gluten-free cookbook and modified it to include some blueberry yogurt and one banana that was floating around my kitchen. The results were quite tasty!!
To balance out the wet ingredients with the yogurt addition, I put slightly less of some ingredients. These are marked with a > symbol.
GF Fluffins (makes 12 fluffins)
Wet Ingredients
2 large eggs
> 3/4 cup milk
> 1/2 cup canola oil
1 single-serving container blueberry yogurt
1 banana, chopped (or smooshed I guess)
1 tsp vanilla extract
Dry Ingredients
1 1/2 cups white rice flour
> 3/4 cup tapioca flour
3/4 cup sugar
1 tbsp baking powder
1 1/2 tsp xanthan gum
1 tsp salt
1) Preheat oven to 375 and grease a muffin tin.
2) Beat eggs with an electric mixer on low speed until yellow and frothy, about 30 seconds. Add all other wet ingredients and mix on low until well blended.
3) Combine dry ingredients in a separate bowl and whisk until combined.
4) Gradually beat dry ingredients into wet ingredients mixture until batter is smooth.
5) Bake on middle rack for 25-30 minutes. Cool in pan for about 10 minutes.
Fluffin batter!
Close-up to show the banana chunks.
I was slightly concerned with the brown color when Steve initially brought them out of the oven, but as you can see the insides are still fluffy and light as ever!
The taste of bananas and blueberries was well-balanced, and I would totally make this again. Not sure how to work the recipe for the glutenous folk, except maybe to just try about 1 3/4 cup of regular flour with no xanthan gum. Don't know if would turn out as fluffy, though! Also, Steve thinks we didn't need as much sugar because of the added ingredients.
Sunday, March 29, 2009
Gail's Soda Bread Muffins
I was pleasantly surprised at how these muffins turned out. For Irish Soda Bread, they turned out pretty moist, which can probably be attributed to the sour cream (you could also use buttermilk or yogurt). I used currants instead of raisins, because even though I like both, I think currants are more authentic. Granted, this isn't an especially authentic recipe! I also didn't add any caraway seeds, mainly due to the fact that I didn't have any and forgot to look for them at the grocery store. Oh, and the flour - King Arthur makes a white whole wheat flour (the recipe IS from their website), but it was not to be found at Shaw's. So I substituted for regular whole wheat flour and actually found that to be rather nice; the muffins were still light from the all-purpose flour, but had a more complex taste and texture from the whole wheat. (For the record, I later found KA's white whole wheat flour at Trader Joe's. It comes in a smaller bag... 2 lb, I think?) Also, the muffins sort of stuck to the muffin papers, but it wasn't too bad. Overall, very tasty and a keeper!
A closer look...

Last weekend, I had another fun adventure in baking - I took a brioche class offered by a woman in Belmont. For those not familiar, I learned that brioche is a type of bread that - unlike many yeast breads - uses both eggs and ridiculous amounts of butter. So it goes without saying that this is a very tasty food. During the class, we used the dough to make a loaf, muffin-sized "petit brioche à tête," an AMAZING egg and veggie torte, and quite possibly the best cinnamon rolls I've ever consumed. At the end of the afternoon, everyone was given a piece of dough to use at home. Unfortunately, everything we made in the class was inhaled by Dave as soon as I got home, so I wasn't able to take pictures of those items. But here is the mini-loaf I made from some of the take-home dough the next day.

If anyone is interested in the dough recipe, let me know!
Monday, March 23, 2009
My Oven's a Lemon
Things have been so busy. I put on my to-do list for the weekend "Make Little Baker Recipes" so I gathered the ingredients for the lemon squares and got off to a flying start... making the crust was easy - I popped it in the oven once the pre-heat light went off and...
and then nothing happened. I mean, it didn't bake, it didn't brown, it just sat there. The oven wasn't warm enough so I turned it up... still nothing. I baked the crust for almost an hour on "375" which I'd guess was closer to 200 degrees.
So... I owe the landlord a call so I can get back up and running...
sigh.
Sunday, March 1, 2009
March Recipes
I really liked Megan's idea for the January post in offering a choice of three recipes, and since I had a hard time choosing between two for the March challenge, I thought I'd do the same. Even though we're expecting a foot of snow over the next twenty-four hours, I'm already in a spring state of mind. Bring on the crocuses, thunderstorms, and Patriots Day (my only spring holiday from work!).
With that in mind, I'm proposing two recipes with a distinctly spring slant - both borrowed from the King Arthur website, which has a lot of other good seasonal recipe ideas. Anyhow, the first is for Irish Soda Bread Muffins, in honor of the upcoming St. Patty's Day. I've always loved Irish soda bread, but who wouldn't agree that muffins are easier to eat?
The second recipe is for Hot Cross Buns, an Easter favorite for many. I'm pretty sure there is some symbolism here (with the cross of icing and all), but regardless, these make for a very yummy breakfast item. They also offer an opportunity to work with yeast, which I freely admit I have yet to master.
Without further ado, the recipes:
Irish Soda Bread Muffins
* 1 1/2 cups All-Purpose Flour
* 3/4 cup White Whole Wheat Flour
* 2 teaspoons baking powder
* 1/4 teaspoon baking soda
* 1/2 teaspoon salt
* 1/3 cup granulated sugar
* 1 1/2 cups currants (first choice) or raisins
* 1/2 to 2 teaspoons caraway seeds, to taste
* 1 large egg
* 1 cup buttermilk, yogurt, or sour cream
* 6 tablespoons butter, melted; or 1/3 cup vegetable oil
* sparkling white sugar, for topping
Directions
1) Preheat the oven to 400°F. Lightly grease a standard muffin pan; or line with papers, and grease the papers.
2) In a medium-sized mixing bowl, whisk together the flours, baking powder, baking soda, salt, sugar, currants or raisins, and caraway seeds.
3) In a separate bowl, whisk together the egg, buttermilk (or equivalent) and melted butter (or equivalent).
4) Quickly and gently combine the dry and wet ingredients; honestly, this won't take more than a few stirs with a bowl scraper or large spoon. As soon as everything is evenly moistened, quit; further stirring will cause the muffins to be tough.
5) Spoon the batter into the prepared pan, filling the cups about 3/4 full; the stiff batter will look mounded in the cups. Top with sparkling white sugar, if desired.
6) Bake the muffins for 20 minutes, until a cake tester inserted into the center of a muffin comes out clean. Remove them from the oven. Tip the muffins in the pan, so their bottoms don't get soggy. Wait 5 minutes, then transfer the muffins to a rack to cool. Serve them plain, or with butter and/or jam.
Hot Cross Buns
Buns
* 1/4 cup apple juice or rum
* 1/2 cup mixed dried fruit
* 1/2 cup raisins or dried currants
* 1 1/4 cups milk, room temperature
* 3 large eggs, 1 separated
* 6 tablespoons butter, room temperature
* 2 teaspoons instant yeast
* 1/4 cup light brown sugar, firmly packed
* 1 teaspoon ground cinnamon
* 1/4 teaspoon ground cloves or allspice
* 1/4 teaspoon ground nutmeg
* 1 3/4 teaspoons salt
* 1 tablespoon baking powder
* 4 1/2 cups Unbleached All-Purpose Flour
Topping
* 1 large egg white, reserved from above
* 1 tablespoon milk
Icing
* 1 cup + 2 tablespoons confectioners' sugar
* 1/2 teaspoon vanilla extract
* pinch of salt
* 4 teaspoons milk, or enough to make a thick, pipeable icing
Directions
1) Lightly grease a 10" square pan or 9" x 13" pan.
2) Mix the rum or apple juice with the dried fruit and raisins, cover with plastic wrap, and microwave briefly, just till the fruit and liquid are very warm, and the plastic starts to "shrink wrap" itself over the top of the bowl. Set aside to cool to room temperature.
3) When the fruit is cool, mix together all of the dough ingredients except the fruit, and knead, using an electric mixer or bread machine, till the dough is soft and elastic. Mix in the fruit and any liquid not absorbed.
4) Let the dough rise for 1 hour, covered. It should become puffy, though may not double in bulk.
5) Divide the dough into billiard ball-sized pieces, about 3 3/4 ounces each. A heaped muffin scoop (about 1/3 cup) makes about the right portion. You'll make 12 to 14 buns. Use your greased hands to round them into balls. Arrange them in the prepared pan.
6) Cover the pan, and let the buns rise for 1 hour, or until they've puffed up and are touching one another. While the dough is rising, preheat the oven to 375°F.
7) Whisk together the reserved egg white and milk, and brush it over the buns.
8) Bake the buns for 20 minutes, until they're golden brown. Remove from the oven, and transfer to a rack to cool.
9) Mix together the icing ingredients, and when the buns are completely cool, pipe it in a cross shape atop each bun.
These lemon bars are tasty!
So in case the title of this entry didn't adequately convey my feelings toward this recipe - YUM! Honestly, I really enjoyed both making and eating the lemon bars. I think it's because I've had these kinds of bars made from a boxed mix before, and this was just exponentially better. In choosing lemons from the grocery store, I did pay extra attention to selecting fruit with a brighter and unblemished peel. I also made one modification to the recipe that I thought would be fun, and that was to substitute out half of the lemon juice for limoncello that Dave and I made a few months ago. If anything, this might have made it a tad sweeter than it would have otherwise been - it may have also brightened the color. Either way, it was very tasty. And still tart, not what I would consider overly sweet.
Originally, I'd intended to take the resulting bars into work and share them with my co-workers. In reality, they didn't last anywhere long enough to do so. It's been a week or two since I made them, but if my memory serves correctly, they were gone in two days. And this was just between Dave and me. This recipe was simple and straightforward to make. It gets two thumbs up and will definitely be added to my recipe repertoire.
In pictures, the whole baking process...
Ingredients

Zest

Mixing all that lemon-y goodness

Bon appetite

I'll also be posting the March recipe shortly. Stay tuned!
Saturday, February 21, 2009
Pistacho Cake and Peanut Butter Munchies
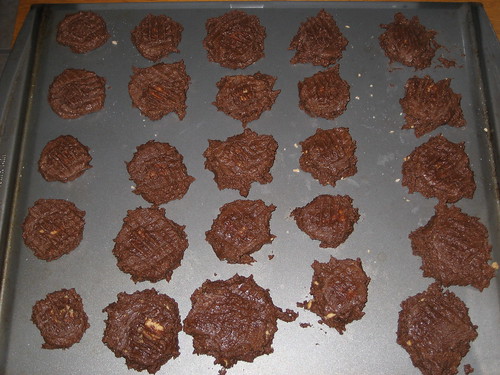
I made the cookies and pistacho cake last weekend, but just getting around to posting the pictures.

The cookies were pretty time consuming. I halfed the recipe because I didn't want to make all those cookies. It was somewhat hard to work with only half the ingredients. For example, taking half the egg was a little non-traditional.
The result, however, was very good cookies and got great reviews by all those who tried them. The peanut butter on the inside was soft and the texture was perfect. I cooked them for exactly 8 minutes.
Here's some pictures of the best of the cookies.


I also made the pistachio cake. Not having a bundt pan, I used the springform pan that we used earlier for the first recipe. (Rem ember that piece of equipment? (= ) It came out delicious, but also had a strange texture. It was wet and heavy...I'm guessing it was due to the sour cream. I called it the shrek cake because of the color and the texture. Pretty much everyone loved it.

The cookies were pretty time consuming. I halfed the recipe because I didn't want to make all those cookies. It was somewhat hard to work with only half the ingredients. For example, taking half the egg was a little non-traditional.
The result, however, was very good cookies and got great reviews by all those who tried them. The peanut butter on the inside was soft and the texture was perfect. I cooked them for exactly 8 minutes.
Here's some pictures of the best of the cookies.


I also made the pistachio cake. Not having a bundt pan, I used the springform pan that we used earlier for the first recipe. (Rem
 ember that piece of equipment? (= ) It came out delicious, but also had a strange texture. It was wet and heavy...I'm guessing it was due to the sour cream. I called it the shrek cake because of the color and the texture. Pretty much everyone loved it.
Thursday, February 19, 2009
Peanutbutter Munchies
Jess and I made the peanut butter munchies almost a month ago but just recently got the pictures up on the internet.
Mixing this recipe wasn't simple. The chocolate portion mixed up just fine and we didn't make the balls ahead of time. Next we mixed up the peanut butter and powdered sugar. We used Jess' mixer and turned the mixture into very small chunks. The mixture never got smooth and so it was hard to actually form balls out of the mixture.
Eventually we were able to form peanut butter balls and surround it with the chocolate mixture. The chocolate mixture was very very sticky(could have been because of our rice/tapioca flour mixture) and it became increasingly complicated to form the chocolate around the peanut butter. Finally we got things sorted out and ended up with a pan of cookies.
I used a fork to press down each cookie.
The end result tasted very good even if they didn't look the best.
Thursday, February 12, 2009
Khabab's Lemon Bars
Hello everyone,
I made the lemon bars a few days ago and they turned out delicious. I found that it was pretty easy to make and they were very tasty. I ate them warm and I ate them cold, and either way they were good.

I took the left-overs (not many) to my co-workers and surveyed those that got a chance to have a piece of this deliciousness.
Everyone liked the texture, overall flavor, and lemon flavor. One person thought it was too "lemony" and too slimy.
I didn't add the powdered sugar on the top, and one of my co-workers recommended to add the powdered sugar. The crust was delicious!
 I also made a quiche (after asking Megan 101 questions!) It turned out very good as well! Hit up Megan for the recipe if you are interested. It's very easy and great for dinner.
Still going to make those peanut butter chocolate cookies and pistachio cake! Will post those soon.
Monday, February 2, 2009
February: Lemon Bars
The February recipe is Lemon Bars.
I have made these bars in the past and they are so very tasty warm from the oven. Make sure the lemons that you buy have a good skin since you will be using it for the zest, you don't have to be to picky but you don't want a bad skin.

CRUST:
1/2 cup (1 stick) (113 grams) unsalted butter, room temperature
1/4 cup (25 grams) confectioner's (powdered or icing) sugar
1 cup (140 grams) all purpose flour
1/8 teaspoon salt
FILLING:
1 cup (200 grams) granulated white sugar
2 large eggs
1/3 cup (80 ml) fresh lemon juice (approximately two large lemons)
1 tablespoons (5 grams) grated lemon zest (2 lemons)
2 tablespoons (25 grams) all purpose flour
TOPPING:
Confectioner's (powdered or icing) sugar
Lemon Zest - The yellow outer rind of the lemon that contains the fruit's flavor and perfume.
TIP: Always remove the zest first before halving and squeezing the lemon. Use a fine strainer to remove the seeds and pulp from the juice.
Preheat oven to 350 degrees F (177 degrees C) and place rack in center of oven. Grease with butter (or use a cooking spray) a 8 x 8 inch (20 x 28 cm) pan.
FOR CRUST: In the bowl of your electric mixer, or with a hand mixer, cream the butter and sugar until light and fluffy. Add the flour and salt and beat until the dough just comes together. Press into the bottom of your greased pan and bake for about 20 minutes, or until lightly browned. Remove from oven and place on a wire rack to cool while you make the filling.
FOR FILLING: In your electric mixer, or with a hand mixer, beat the sugar and eggs until nice and smooth. Add the lemon juice and zest and stir to combine. Fold in the flour. Pour the filling over the shortbread crust and bake for about 20 minutes, or until the filling is set. Remove from oven and place on a wire rack to cool.
To serve: Cut into squares or triangles and dust with powdered sugar. These are best eaten the day they are made but can be covered and stored in the refrigerator for a day or two.
Yield: 16 - 2 inch (5 cm) squares
Sunday, January 11, 2009
Loafin' Around
Last night I finally made the meat loaf. I have to say that it was much better than I had expected. I don't much care for meat loaf. Sorry Mom, but the recipe I grew up on was kind of... well... this one is much better.
Since I am back to counting points, and we rarely eat red meat around here, I used ground turkey. I also used Craisins instead of dried apricots and raspberry jam for the glaze, oh and whole wheat bread. I did my best to figure out the points, and found this recipe to be a great addition to our standard set of menus. I served mixed veggies on the side to give the dinner some bulk.
I liked how easy this recipe was, and the tangy sweet flavor the jam added.... as well as the cranberries. If I ever think to buy cranberry sauce, I'd likely pair that with the Worcestershire sauce for the glaze.
Yassine ate nearly the whole loaf in less than 24 hours, so I know I'll be making/teaching him how to make it again!
I'd definitely try this with craisins for anyone who may not have an affinity for apricots.
Happy Baking!
Sunday, January 4, 2009
January Recipe: Pick One of Three!
I've decided to post three of the recipes I made during the month of December and let you each pick which one you want to make. They are three varying degrees of time intensiveness and I will put them in order from easy to difficult. So your three options are wicked fast: Pistachio Cake; on the quick: Low Fat Banana Bread; Worth the wait: Peanutbutter Munchies.

In a large bowl stir together cake mix and pudding mix. Make a well in the center and pour in eggs, water, sour cream, almond extract and green food coloring. Blend ingredients, then beat for 2 minutes at medium speed.
Pour into prepared bundt pan. Bake in the preheated oven for 50 to 55 minutes, or until cake springs back when lightly pressed. Cool in pan 15 minutes. Turn out onto a wire rack and cool completely.
In a separate bowl, sift together flour, baking powder, baking soda and salt. Stir flour mixture into banana mixture, mixing just until blended. Fold in walnuts.

Ingredients
1-1/2 cups all-purpose flour
1/2 cup unsweetened cocoa powder
1/2 teaspoon baking soda
1/2 cup butter, softened
1/2 cup granulated sugar
1/2 cup packed brown sugar
1/4 cup peanut butter
1 egg
1 tablespoon milk
1 teaspoon vanilla
3/4 cup sifted powdered sugar
1/2 cup peanut butter
2 tablespoons granulated sugar
2. In a large mixing bowl beat together butter, the 1/2 cup granulated sugar, brown sugar, and the 1/4 cup peanut butter with an electric mixer until combined. Add egg, milk, and vanilla; beat well. Beat in as much of the dry ingredients as you can with mixer. Stir in remaining dry ingredients by hand with a wooden spoon. My own advice here: Do not make the 32 balls all at once for either the chocolate or peanutbutter - I'd make them as you go. Form chocolate dough into 32 balls about 1-1/4 inches in diameter. Set aside.
3. For peanut butter filling, in a medium mixing bowl combine powdered sugar and the remaining 1/2 cup peanut butter until smooth. Shape mixture into 32 (3/4-inch) balls.
4. On a work surface, slightly flatten a chocolate dough ball and top with a peanut butter ball. Shape the chocolate dough over the peanut butter filling, completely covering the filling. Roll dough into a ball. Repeat with the remaining chocolate dough and peanut butter filling balls.
5. Place balls 2 inches apart on an ungreased cookie sheet. Lightly flatten with the bottom of a glass dipped in the 2 tablespoons granulated sugar.
6. Bake cookies in preheated oven for 8 minutes or until they're just set and surface is slightly cracked. Let cookies stand for 1 minute. Do not over cook these tasty treats - you want them to be chewy not crunchy! Transfer cookies to wire racks; cool. Makes 32 cookies.
To Store: Place in layers separated by waxed paper in an airtight container; cover. Store at room temperature for up to three days or freeze for up to three months.
Pistachio Cake
(From Allrecipes.com)

INGREDIENTS
1 (18.25 ounce) package yellow cake mix
1 (3.4 ounce) package instant pistachio pudding mix
2 eggs
1 1/2 cups water
1 container sour cream
1/2 teaspoon almond extract
7 drops green food coloring
1 (3.4 ounce) package instant pistachio pudding mix
2 eggs
1 1/2 cups water
1 container sour cream
1/2 teaspoon almond extract
7 drops green food coloring
Frosting (Optional)
1 tub of whipped topping
1 (3.4 ounce) package instant pistachio pudding mix
7 drops green food coloring
DIRECTIONS
Preheat oven to 350 degrees F (175 degrees C). Grease and flour a bundt pan.
DIRECTIONS
Preheat oven to 350 degrees F (175 degrees C). Grease and flour a bundt pan.
In a large bowl stir together cake mix and pudding mix. Make a well in the center and pour in eggs, water, sour cream, almond extract and green food coloring. Blend ingredients, then beat for 2 minutes at medium speed.
Pour into prepared bundt pan. Bake in the preheated oven for 50 to 55 minutes, or until cake springs back when lightly pressed. Cool in pan 15 minutes. Turn out onto a wire rack and cool completely.
Frosting:
Mix whipped topping, pudding mix, and food coloring.
Lower Fat Banana Bread
(From Allrecipes.com)
(From Allrecipes.com)
INGREDIENTS
2 eggs
2/3 cup white sugar
2 very ripe bananas, mashed
1/4 cup applesauce
1/3 cup nonfat milk
1 tablespoon vegetable oil
1 tablespoon vanilla extract
1 3/4 cups all-purpose flour
2 teaspoons baking powder
1/2 teaspoon baking soda
1/2 teaspoon salt
1/3 cup chopped walnuts
2/3 cup white sugar
2 very ripe bananas, mashed
1/4 cup applesauce
1/3 cup nonfat milk
1 tablespoon vegetable oil
1 tablespoon vanilla extract
1 3/4 cups all-purpose flour
2 teaspoons baking powder
1/2 teaspoon baking soda
1/2 teaspoon salt
1/3 cup chopped walnuts
1/3 cup mini chocolate chips (optional, although I've always used them!)
DIRECTIONS
Preheat oven to 325 degrees F. Spray a bread pan with non-stick cooking spray, and lightly dust with flour. In a large bowl, beat eggs and sugar in a large bowl until light and fluffy, about five minutes. Beat in bananas, applesauce, milk, oil and vanilla.
DIRECTIONS
Preheat oven to 325 degrees F. Spray a bread pan with non-stick cooking spray, and lightly dust with flour. In a large bowl, beat eggs and sugar in a large bowl until light and fluffy, about five minutes. Beat in bananas, applesauce, milk, oil and vanilla.
In a separate bowl, sift together flour, baking powder, baking soda and salt. Stir flour mixture into banana mixture, mixing just until blended. Fold in walnuts.
Pour batter into prepared pan. Bake in preheated pan until golden and a toothpick inserted into center of the loaf comes out clean, about 1 hour. Turn bread out onto a wire rack and let cool.
Peanutbutter Munchies
(From Better Homes and Gardens)
(From Better Homes and Gardens)
Ingredients
1-1/2 cups all-purpose flour
1/2 cup unsweetened cocoa powder
1/2 teaspoon baking soda
1/2 cup butter, softened
1/2 cup granulated sugar
1/2 cup packed brown sugar
1/4 cup peanut butter
1 egg
1 tablespoon milk
1 teaspoon vanilla
3/4 cup sifted powdered sugar
1/2 cup peanut butter
2 tablespoons granulated sugar
Directions
1. Preheat oven to 350 degree F. In a medium mixing bowl stir together flour, cocoa powder, and baking soda; set aside.
1. Preheat oven to 350 degree F. In a medium mixing bowl stir together flour, cocoa powder, and baking soda; set aside.
2. In a large mixing bowl beat together butter, the 1/2 cup granulated sugar, brown sugar, and the 1/4 cup peanut butter with an electric mixer until combined. Add egg, milk, and vanilla; beat well. Beat in as much of the dry ingredients as you can with mixer. Stir in remaining dry ingredients by hand with a wooden spoon. My own advice here: Do not make the 32 balls all at once for either the chocolate or peanutbutter - I'd make them as you go. Form chocolate dough into 32 balls about 1-1/4 inches in diameter. Set aside.
3. For peanut butter filling, in a medium mixing bowl combine powdered sugar and the remaining 1/2 cup peanut butter until smooth. Shape mixture into 32 (3/4-inch) balls.
4. On a work surface, slightly flatten a chocolate dough ball and top with a peanut butter ball. Shape the chocolate dough over the peanut butter filling, completely covering the filling. Roll dough into a ball. Repeat with the remaining chocolate dough and peanut butter filling balls.
5. Place balls 2 inches apart on an ungreased cookie sheet. Lightly flatten with the bottom of a glass dipped in the 2 tablespoons granulated sugar.
6. Bake cookies in preheated oven for 8 minutes or until they're just set and surface is slightly cracked. Let cookies stand for 1 minute. Do not over cook these tasty treats - you want them to be chewy not crunchy! Transfer cookies to wire racks; cool. Makes 32 cookies.
To Store: Place in layers separated by waxed paper in an airtight container; cover. Store at room temperature for up to three days or freeze for up to three months.
Happy Baking Everyone!
Oh - and yes, I made the spritz cookies, but forgot to take photos, then my family ate them all during Christmastime :) I will have to try them again. They are a very buttery cookie, but it does make a large volume of cookies (because they are fairly small). I had a lot of trouble getting the cookiepress to make a uniform sized cookie, and also had trouble getting the dough to stick to the cookie sheet. This is likely because my cookie sheets are non-stick already and that is NOT what you want to use when using a cookie press. I tried using aluminum foil, but that didn't seem to work either. Even if they were a little funny looking, they still tasted good and there were no complaints from my family members! I ended up using the Spritz recipe out of my Pillsbury cook book. I think I'll try the recipe Jess posted next time, maybe I'll have better luck with the consistency.
~mrs. curlyhairedmegan
Saturday, January 3, 2009
Love the Loaf!
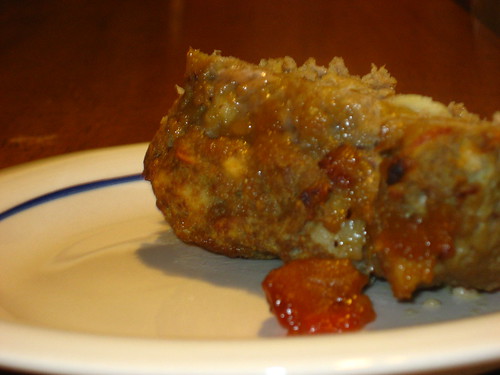
Blame it on the holidays - we finally got around to making the December meatloaf! We substituted lean ground turkey for the beef and had to use rice bread instead of 'regular' sandwich bread. We weren't quite sure how it would turn out. The rice bread has a different consistency to it, and it was frozen when we bought it a half an hour before using it.

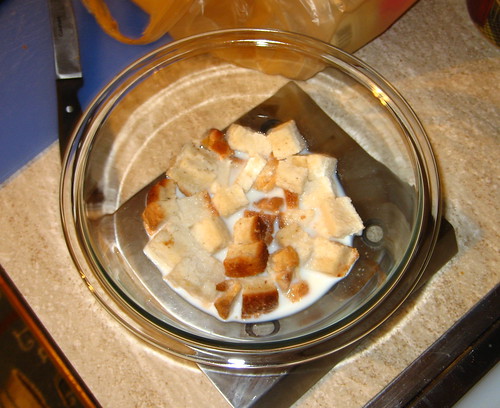
(it's out of focus but you get the idea)
The finished loaf was great (and that's coming from someone who is not a fan of meatloaf!). I liked the sweetness of it, and its overall consistency. Steve noted that next time we need to chop the bread smaller. He also said the curry and apricots give it a very different taste than standard meatloaf.
Just as an aside, to go along with the meatloaf we made an apricot and kale salad. Shredded kale, sliced green bell peppers, tomatoes, cut apricots, crumbled goat cheese, and balsamic vinaigrette as a dressing. The balsamic vinaigrette offsets the sweetness of the apricots.
Subscribe to:
Posts (Atom)